
Hey guys -
So I decided to take the DIY CO2 plunge for my planted 10g and thought I'd document my build for fun! I set this up about 2 days ago so I have no growth results yet but so far it's going pretty well!
Sorry if my walkthrough is short.. I spent about 45 minutes writing this up and my browser crashed when I submitted so I had to start from scratch....
I decided to go with the recipe posted by cobfreak in the DIY CO2 newbie support group thread.
First step was to setup the plumbing. I'm using a 2L for the reactor and a mini plastic soda bottle for the gas separator and bubble counter. My tubing is the black silicone tubing available from Pet*mart (or any Chain/LFS store really..)
First step was to drill the holes to get the tubing through the bottle caps. I used a 3/16" drill bit for the hole, cut the tubing at an angle, and pulled it through with pliers.


For the bubble counter I used a section of rigid tubing to make sure it went deep enough into the container. I pulled silicone tubing through and shoved the
rigid tubing in to extend it.


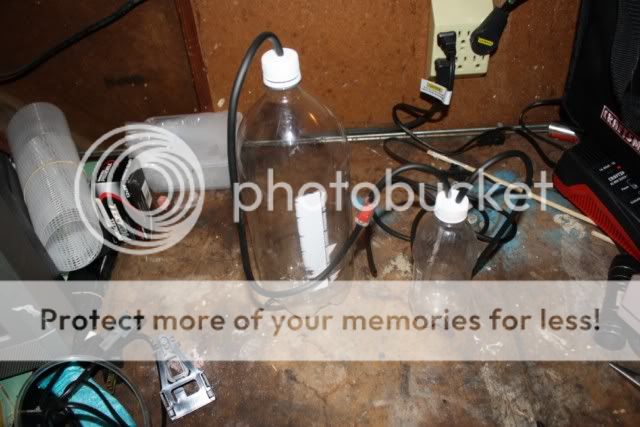
I did a quick fit test before I siliconed. You'll notice the check valve after the 2L to prevent back-siphoning!
For the silicone I chose an aquarium-safe DAP silicone I had lying around..

I siliconed fairly generously on the outside of the cap only. I didn't do the inside because the tubing is snug enough plus I didn't want to get any in the
threads of the cap..


I let it all cure for 24 hours before heading into the kitchen!
You'll see just about everything I used here:
- Fleischmann's RapidRise yeast.
- Sugar
- Water at 105F
- Measuring cups
- Funnel (not pictured)
- Baking Soda (not pictured)


From the recipe above I did the following:

Next, I added 2 cups of sugar to my 2L and enough of the 105F water to hit the shoulder of the bottle (my final mixture had 4" to the top).

I mixed them all and sprinkled 1tsp of baking soda before capping!

You'll see that I also filled the bubble counter about halfway with water so I'd be able to see when bubbles came out of the rigid tubing!
I set it next to my aquarium and shoved the tubing into the HOB intake (temporary because it's loud to hear the bubble hit the impeller every second or so)


I went to work and came back that evening to... BUBBLES!

I'm currently getting about 1 bubble per second but I haven't done any CO2 ppm measurement. After another day or so I'll use the degassing method to figure it out!
I'll update you with growth results, I hope you enjoyed my DIY build! Not the first, or the last, but hopefully it helped SOMEONE.
Comments/Questions/Concerns appreciated!
Best Regards,
Patrick
So I decided to take the DIY CO2 plunge for my planted 10g and thought I'd document my build for fun! I set this up about 2 days ago so I have no growth results yet but so far it's going pretty well!
Sorry if my walkthrough is short.. I spent about 45 minutes writing this up and my browser crashed when I submitted so I had to start from scratch....
I decided to go with the recipe posted by cobfreak in the DIY CO2 newbie support group thread.
activate yeast:
1/4 cup hot water (105 - 115 degrees)
1/4 teaspoon sugar (for yeast activation)
3/4 teaspoon yeast
heat water to 105 degrees f, stir in sugar. Dump 3/4 teaspoon yeast into spinning mixture.
main mixture:
2 cups sugar (for main mixture)
? warm water (to fill bottle to shoulder)
1 teaspoon? baking soda
once yeast is activated, poor sugar and 2 cups water mixture into bottle. Or poor them separately and mix them in the bottle. Once that mixed, and with the
water not too hot, add yeast mixture from above. Then add baking soda. Then fill the rest of the bottle with warm water, up to the bottle's shoulder (leave some space.)
First step was to setup the plumbing. I'm using a 2L for the reactor and a mini plastic soda bottle for the gas separator and bubble counter. My tubing is the black silicone tubing available from Pet*mart (or any Chain/LFS store really..)
First step was to drill the holes to get the tubing through the bottle caps. I used a 3/16" drill bit for the hole, cut the tubing at an angle, and pulled it through with pliers.
For the bubble counter I used a section of rigid tubing to make sure it went deep enough into the container. I pulled silicone tubing through and shoved the
rigid tubing in to extend it.
I did a quick fit test before I siliconed. You'll notice the check valve after the 2L to prevent back-siphoning!
For the silicone I chose an aquarium-safe DAP silicone I had lying around..
I siliconed fairly generously on the outside of the cap only. I didn't do the inside because the tubing is snug enough plus I didn't want to get any in the
threads of the cap..
I let it all cure for 24 hours before heading into the kitchen!
You'll see just about everything I used here:
- Fleischmann's RapidRise yeast.
- Sugar
- Water at 105F
- Measuring cups
- Funnel (not pictured)
- Baking Soda (not pictured)
From the recipe above I did the following:
This gave me this delicious mixture:activate yeast:
1/4 cup hot water (105 - 115 degrees)
1/4 teaspoon sugar (for yeast activation)
3/4 teaspoon yeast
heat water to 105 degrees f, stir in sugar. Dump 3/4 teaspoon yeast into spinning mixture.
Next, I added 2 cups of sugar to my 2L and enough of the 105F water to hit the shoulder of the bottle (my final mixture had 4" to the top).
I mixed them all and sprinkled 1tsp of baking soda before capping!
You'll see that I also filled the bubble counter about halfway with water so I'd be able to see when bubbles came out of the rigid tubing!
I set it next to my aquarium and shoved the tubing into the HOB intake (temporary because it's loud to hear the bubble hit the impeller every second or so)
I went to work and came back that evening to... BUBBLES!
I'm currently getting about 1 bubble per second but I haven't done any CO2 ppm measurement. After another day or so I'll use the degassing method to figure it out!
I'll update you with growth results, I hope you enjoyed my DIY build! Not the first, or the last, but hopefully it helped SOMEONE.
Comments/Questions/Concerns appreciated!
Best Regards,
Patrick

")
")
