Feeder for Eclipse hoods
Hey everyone... this is my first post, so here goes...
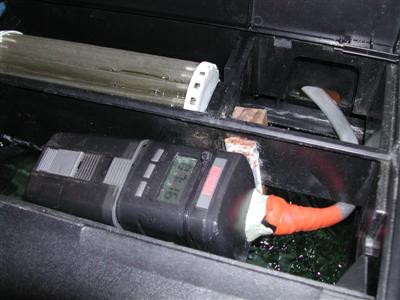
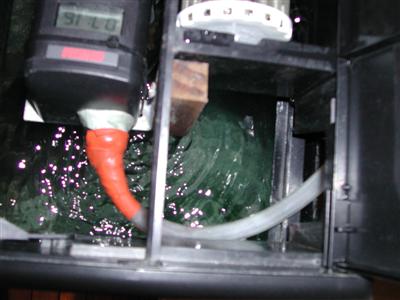
I setup an eheim "feed air" automatic feeder in my Eclipse 3. Please forgive the messy pictures, but I only had a few moments to snap some quick photos to show you my first-attempt at a solution. Mounting it was easy, the hardest part was getting enough fresh, dry air to the feeder so that the high humidity didn't quickly turn the food to mush.
To secure the feeder in the hood, I drilled a couple of small holes and used an L-shaped metal bracket (90 degree angle) and small scrap of wood to attach it to the vertical brace on the hood. The feeder attaches to the L-bracket by way of a zip tie, so that it can be easily removed if needed.
I molded some epoxy putty (silicone would have worked, too but I had the epoxy on hand) to attach some about 8 inches of 1/2" diameter flexible clear vinyl tubing to the fresh-air port of the feeder. To ensure an airtight seal between the putty and the tubing, I used some self-vulcanizing tape that I had on hand. I routed the end of this tubing out the accessory port of the eclipse 3.
Although I thought this would be enough for the small fan in the feeder to pull enough fresh air in, I only had limited success - after about a week, the flakes would be slightly clumped and after about 10 days, the flakes would be fully stuck together. To increase the amount of fresh air, I used a small, cheap air pump and stuck the end of the airline into the end of the 1/2" clear vinyl tubing. I used another small section of the self-vulcanizing tape to seal the gap between the airline and the 1/2" tubing. This set up has worked flawlessly and kept food fresh for as long as a month. Before anyone gets upset, the longest time I actually left the tank unattended was 2 weeks. 8)
For those not familliar with the Eheim feeder I used, the hopper is filled by removing the translucent reservoir. It runs on 2 AA batteries which are inserted by the rear cover where the 1/2" tubing is attached to the feeder. The zip tie was carefully located so that filling the feeder and battery changes can all occur without needing to remove the feeder from the bracket or cutting the zip tie. The feeder can be set to feed up to 4 times a day. The quantity of food dispensed can be adjusted in two ways: 1)The food hopper can be set to rotate once or twice per feeding (and even once for some feedings and twice for others) and 2) the size of the drop port where food exits can be easily adjusted by a sliding cover. As an added plus, if you set the feeder for 2 rotations, the 2nd rotation occurs about a minute after the first rotation so that your fish have time to eat some of the food before more is dumped.
If you've read this far, your reward is the next paragraph where I tell you what I learned from my first attempt and how yours can be much more elegant:
Instead of using the 1/2" tubing, I would just use a airline connector and secure it with the same epoxy putty. Then you could just plug the airline in to the back of the feeder and have a much more elegant solution.
Eheim Feed-Air Feeder


