
This project was the result of two seperate things:
1) I wanted to create a wall for the Suesswassertang to attach to.
2) I also wanted to hide the heater.
Part 1 would be simple. I could just get some plastic grid material and affix the Suesswassertang to it. Simple. But then I got to thinking...How could I maximize the wall and hide the heater at the same time. Solution: Create a ledge. This enables me to plant something on the top of the ledge which will help hide the heater as well.
So here's how I did it.
Step I: Making the Ledge
........... Materials: 1 sheet plastic canvas
..........................tape
..........................wood blocks
........... Tools:..... Heat gun
..........................Scissors
..........................Case Knife

........... 1) Cut the canvas to the desired lengths. This part may be a bit of trial and error to get to the size you want.

........... 2) Using the blocks of wood for support, tape two pieces of the canvas to the wood forming a seam at the edge of the wood.
........... *** CAUTION *** Use caution during this next step as you will be using a heat gun and it will get extremely hot.
........... 3) Using the heat gun, slowly melt the two edges of the canvas to make a joined seam. The plastic will turn clear when hot enough making it look like water. This will be very hot so be carefull.
........... * NOTE I * Keep the heat gun moving. Do not keep it in one spot. This will help to avoid over heating and ruining the project.
........... * NOTE II * During the heating process, you may find that one (or both) sides will buckle out. Taking a flat edge, you can slowly run it up and down the canvas and place it back into form.
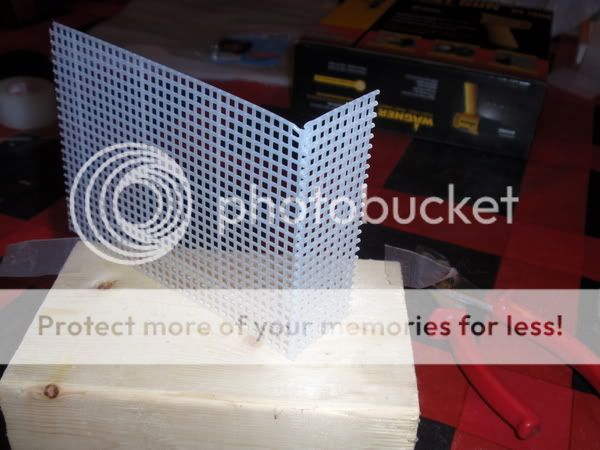
........... * NOTE III * In doing this, I found it actually better melting from bottom to top instead of side to side as depicted in the earlier pic. Basically melting it as shown in the picture above.
........... 4) Repeat the last step for the remaining seams. It can be a bit difficult at time to get the last two seams together so use patience. It will all come together.
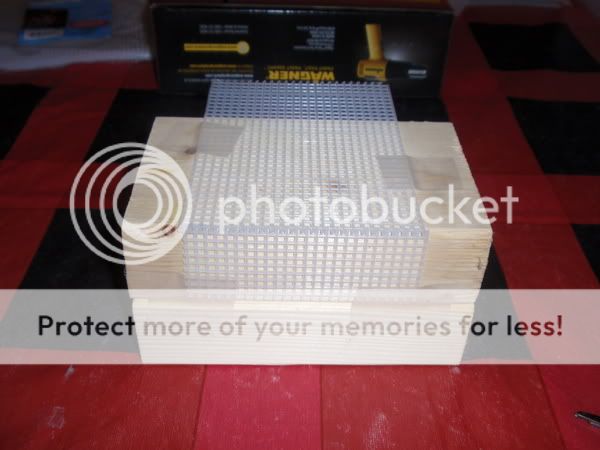
........... 5) When finished, you should have a product that looks similar to this:

This was my first attempt. I had the dimensions wrong and it actually did not work as 90 degree angle. I made another one and as well, didn't get the dimensions correct. I'm not a major in geometry. ;o)
When you get the dimensions right, it will fall perfectly into place. I placed the finished product in my algae tank to test it (notice the chunks of algae in the sand I had scraped off the walls for the pics). Here's the finished product:
From the top:

From the front:

The middle will be filled with the SMS substrate and planted with Echinodorus Angustifolia.
This will replacing my makeshift wall which simply two pieces of the canvas held to the tank using suction cups. This allow the SMS to stay in place instead of leaking through the sides from the current one.
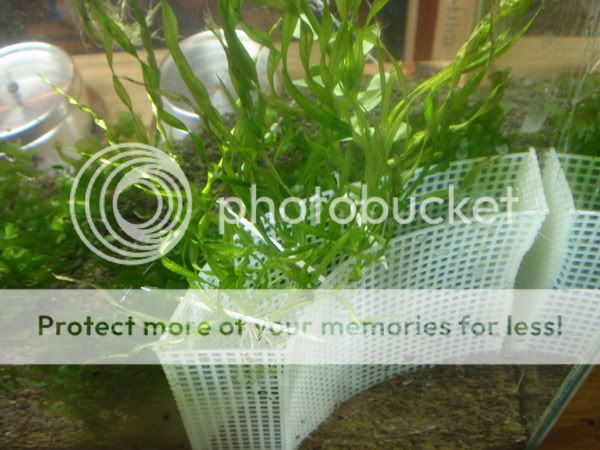
To attach the Suesswassertang, use fishing line and thread it through the holes of the grid. The line will go over the Suesswassertang. You can gently pull it into place and tie the line. Once the Suesswassertang takes hold, you can remove the line.
To plant the Echinodorus Angustifolia, lower the plant into the middle of the ledge to the depth you will be planting. Take a toothpick and run it through the grid in the middle the of the EA and out the other end. This will hold the plant in place while you fill with substrate. I will be using 5-6 plants to place on top.
That should do it. I'll post pics of the Suesswassertang and Echinodorus when I move the ledge to the Oto tank.
1) I wanted to create a wall for the Suesswassertang to attach to.
2) I also wanted to hide the heater.
Part 1 would be simple. I could just get some plastic grid material and affix the Suesswassertang to it. Simple. But then I got to thinking...How could I maximize the wall and hide the heater at the same time. Solution: Create a ledge. This enables me to plant something on the top of the ledge which will help hide the heater as well.
So here's how I did it.
Step I: Making the Ledge
........... Materials: 1 sheet plastic canvas
..........................tape
..........................wood blocks
........... Tools:..... Heat gun
..........................Scissors
..........................Case Knife
........... 1) Cut the canvas to the desired lengths. This part may be a bit of trial and error to get to the size you want.
........... 2) Using the blocks of wood for support, tape two pieces of the canvas to the wood forming a seam at the edge of the wood.
........... *** CAUTION *** Use caution during this next step as you will be using a heat gun and it will get extremely hot.
........... 3) Using the heat gun, slowly melt the two edges of the canvas to make a joined seam. The plastic will turn clear when hot enough making it look like water. This will be very hot so be carefull.
........... * NOTE I * Keep the heat gun moving. Do not keep it in one spot. This will help to avoid over heating and ruining the project.
........... * NOTE II * During the heating process, you may find that one (or both) sides will buckle out. Taking a flat edge, you can slowly run it up and down the canvas and place it back into form.
........... * NOTE III * In doing this, I found it actually better melting from bottom to top instead of side to side as depicted in the earlier pic. Basically melting it as shown in the picture above.
........... 4) Repeat the last step for the remaining seams. It can be a bit difficult at time to get the last two seams together so use patience. It will all come together.
........... 5) When finished, you should have a product that looks similar to this:
This was my first attempt. I had the dimensions wrong and it actually did not work as 90 degree angle. I made another one and as well, didn't get the dimensions correct. I'm not a major in geometry. ;o)
When you get the dimensions right, it will fall perfectly into place. I placed the finished product in my algae tank to test it (notice the chunks of algae in the sand I had scraped off the walls for the pics). Here's the finished product:
From the top:
From the front:
The middle will be filled with the SMS substrate and planted with Echinodorus Angustifolia.
This will replacing my makeshift wall which simply two pieces of the canvas held to the tank using suction cups. This allow the SMS to stay in place instead of leaking through the sides from the current one.
To attach the Suesswassertang, use fishing line and thread it through the holes of the grid. The line will go over the Suesswassertang. You can gently pull it into place and tie the line. Once the Suesswassertang takes hold, you can remove the line.
To plant the Echinodorus Angustifolia, lower the plant into the middle of the ledge to the depth you will be planting. Take a toothpick and run it through the grid in the middle the of the EA and out the other end. This will hold the plant in place while you fill with substrate. I will be using 5-6 plants to place on top.
That should do it. I'll post pics of the Suesswassertang and Echinodorus when I move the ledge to the Oto tank.


")


