DIY 72g Build w/custom canopy, UGJ & lots of extras (picture heavy)

  • Get the NEW AquariaCentral iOS app --> http://itunes.apple.com/app/id1227181058 // Android version will be out soon!

DAVIDFBT

Extinct? Since when?
Feb 3, 2008
3,584
0
0
30
Great Lakes, Illinois
Real Name
Definitely not David
Nice job with the stand. Yes, my 55 held up after 48 hours of water, and not a single drop spilled. I was just worried it might leak and I would have to tear out all the silicone and restart it.
 

myswtsins

Global Moderator
Jun 15, 2008
3,556
390
92
41
Central NJ
Real Name
Jen
Camera Used
Canon PowerShot SX260 HS
Thanks! I love the bowfronts too. Ideally I wanted to buy a 72g bowfront when I had the money but this one just kinda fell into my lap!

Nice job with the stand. Yes, my 55 held up after 48 hours of water, and not a single drop spilled. I was just worried it might leak and I would have to tear out all the silicone and restart it.
Good to hear! Yeah starting all over again is not something I look forward to, although it really was not that bad.
 

myswtsins

Global Moderator
Jun 15, 2008
3,556
390
92
41
Central NJ
Real Name
Jen
Camera Used
Canon PowerShot SX260 HS
FINALLY finished sanding the stand today! There are a lot of cracks & edges on this stand. (I think I am gonna change the title of this thread to include everything I am doing with the tank BTW)

I took a trip up to north NJ yesterday to get the 3m colorquartz S grade black crystals & they are beautiful! I got 150lbs for $80, not bad I think. I came home and immediately decided that the tank needs to be in the living room NOW! :) I removed most of the water from the tank and everything seems to be fine but I will let it sit over night with less water & see what happens (less pressure holding any lifted silicone down).

I bought all the wood to start building the canopy and the construction should be fairly easy with my new revised plans. I should have some picture updates & crappy drawings tomorrow.

I decided to add an undergravel jet system too.

Tonight's Mission - BUY BUY BUY!! Going to order most of my supplies.
Tomorrow's Mission - UGJ & hopefully stain the stand & probably continue working on the canopy. I can't work on just one thing at a time!! :D

*edit* Oh if you click on the "stock with Mbuna Cichlids" link in my signature you can see everything I plan to do with the tank. Almost everything you need to know IS in the first post.
 
Last edited:

JasonR

Spy sappin' mah sentry.
Jan 19, 2008
101
0
0
I am VERY interested in your plans for the canopy. I have that exact same stand except in black for my 72 bow and I would love to have a canopy.
 

myswtsins

Global Moderator
Jun 15, 2008
3,556
390
92
41
Central NJ
Real Name
Jen
Camera Used
Canon PowerShot SX260 HS
Plans? It is more like doodling really. :) 
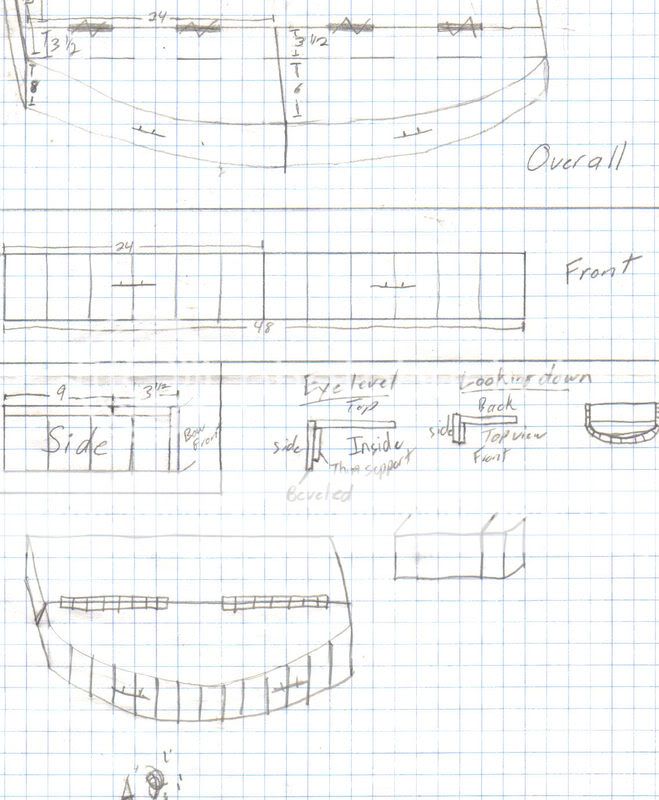
I will certainly share my "plans" but they were revised before & during construction so they are not accurate to what I actually did. If you have the same pine stand as me I can assure you that building a canopy to match may be easier than the standard flat sided canopies. So lets get some pictures going here!


We will start with the scary stuff. This is my doodle. (which the top half got cut off by the scanner! I will try to rescan this) The neater stuff at the top was plans before I had the tank so the dimensions are not accurate. The second half is the 1st revision & the last revision was done while working and not written down.


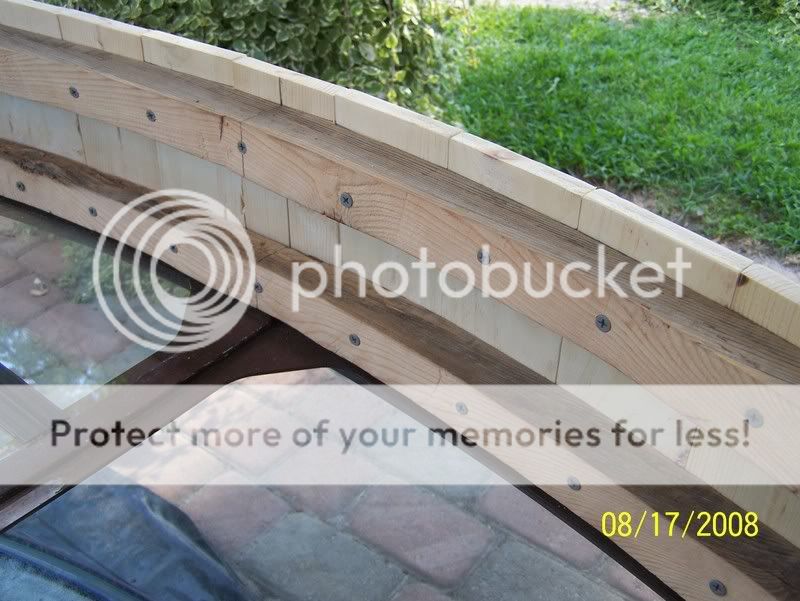
A bit of a jump for a first photo I know. First thing we did was decieded againist bowing pieces of wood for the frame. Instead we cut a curved section of wood, see photo after next. All the outer pieces were beveled and applied to the curved wood with screws from the back. Of course we drilled the holes first, wouldn't want to crack those nice pieces. We started in the middle and worked our way out cutting off the excess at the ends.


Full tank shot


As you can see we actual cut curved pieces of wood out instead of bowing ANY wood!! It was easy to get the bow correct because all we did was place the wood on top of the tank and traced! It doesn't get more accurate than a trace. :) The inner edges are kinda curvy because they did have to be perfect. These pieces were old ramps we used for loading our quads so any wood will do!


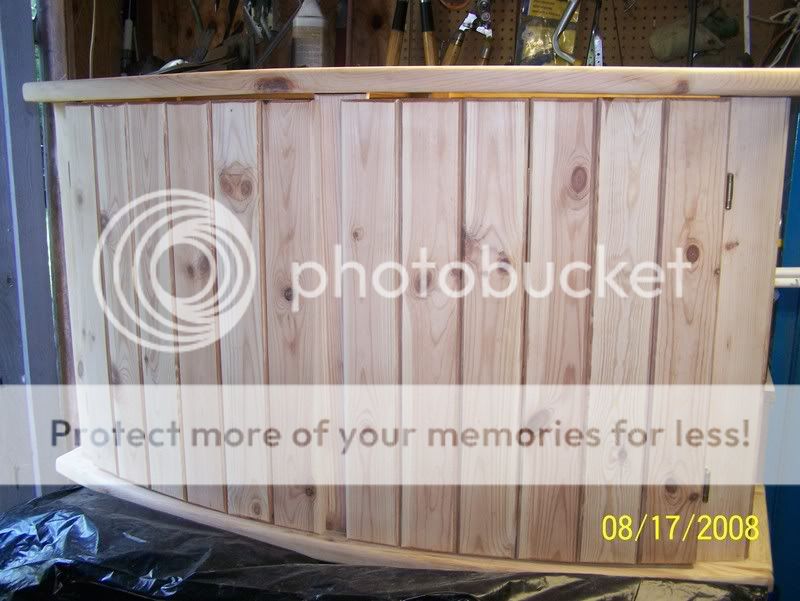
From the other side with a little more light.


The top piece was glued on. This did require some sanding to get it almost flush with the beveled pieces since all the beveled pieces did not line up perfectly.


Clamp, clamps, clamps! BTW all the wood was lightly sanded before assembly. But that is it for the canopy for right now.

A little update on the stand....

COMPLETELY sanded! I hope I never have to do this again! We originally tried a vanish remover but it did not lift all the old stain and left black in the tiny creases in the wood.


2 coats of Golden Oak stain, about 15 years old! :) This stain was used in the living room so it should match pretty closely (have to account for age). I applied it with an old T-shirt instead of a brush this way there is not need to wipe excess off. You can see how badly the doors bowed from years of hanging so we unscrewed them (not glued down) and added a couple washers to the bottom hinges and they are nice and straight now.

I found the old varnish from the living room as well (you wouldn't believe the collection of "stuff" we have from our many projects). I applied a coat onto a test piece to see how it comes out. I will know that tomorrow.

UGJ System

Here are the plans for the UGJ system, more doodles. They are not to scale in any way! The squiggle in the center of the tank is the "rocks". I am a visual person so this is what I did....

Taadaa! The only thing that had to be exact was the distance from the back glass to the pipes because the powerheads can only be placed one way. I will be hooking up 2 maxi-jet 1200 powerheads to this with 8 jets. After placing the connectors in the tank I realized there was no need for any angled jets. I also think I will point the back 2 jets towards the glass to give a little more space for rocks.

So I ordered all my parts and should get some in a couple days. OH and I am adding moon & sunrise lights (blue & red cold cathode) too. This has turned into one heck of a project & I am loving it! If only I could make my own rocks for the tank than I would be set! :) Thanks for looking! If anyone has any questions feel free to ask.
 

spunjin

Manzanita Supplier
Aug 7, 2008
386
0
16
Ridgecrest, CA
seanrubino.com
Real Name
Sean Rubino
Camera Used
iPhone X
That is awesome! I went looking for pine boards today to get started on my canopy as well. BK has a great question. I would like to know the same. Are the pine boards 1 x 4's or 1/2 x 4's? Are you going to give the top of the canopy an overlapping ledge like the the stand? What ever you decide to do I am inspired.
 

myswtsins

Global Moderator
Jun 15, 2008
3,556
390
92
41
Central NJ
Real Name
Jen
Camera Used
Canon PowerShot SX260 HS
I really enjoy the build too!

The front boards are 4 x 3/4 & yes just cut down and router away. For anyone not familiar with wood a 4 x 3/4 is actually 3.5inches wide and 3/4 of an inch thick, don't ask my why! :)

There will not be a ledge on the top of the canopy but that is a great idea, never thought that. That would make an easy opening too, not having to worry about everything matching up so much.

No pictures today, sorry. I will take some tomorrow before I start though. I have the UGJ almost completed, cleaned the excess silicone off the tank, put the 1st coat of vanish on the stand & I have the rest of the canopy cut and somewhat together.

I need to do some more shopping tomorrow for the moon & sunrise lights & other odds & ends. My AHsupply lights should arrive tomorrow too. The tank should be complete and in the living room by the end of the weekend if all goes according to plan!
 
zoomed.com
hikariusa.com
aqaimports.com
Store