New 90L Betta Barracks...

  • Get the NEW AquariaCentral iOS app --> http://itunes.apple.com/app/id1227181058 // Android version will be out soon!

ghengis

cunninglinguist
Jun 23, 2008
188
0
0
Cairns, Australia.
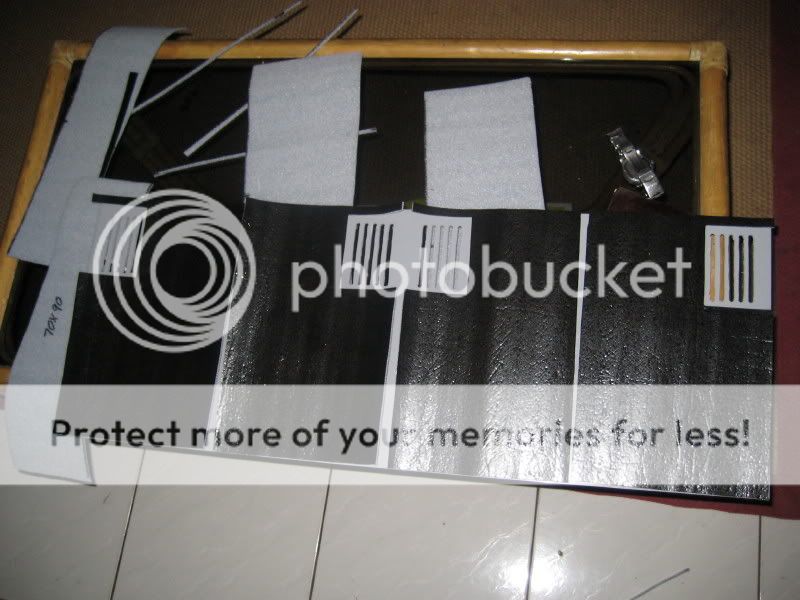
Progress. After discovering that those little rough discs in my "Dremel" kit were cutting wheels and not just sanding discs, I was able to make short work of the remaining slots. A little rough here and there, but as each will be covered, it matters not. I've also cut-to-size what I intend to use as a background. This is a 3mm sheet of flooring underlay. Any ideas how this stuff will hold up under water? I'll seal it well, but just need to be cautious...


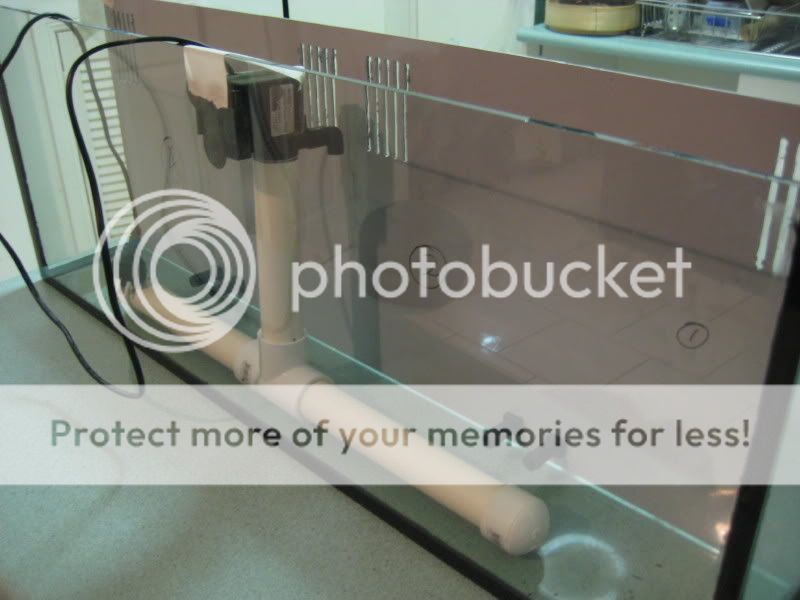
I redid the filter uptake, as well. Wasn't entirely happy with the idea behind the first attempt. Now I just have an inverted "T" of PVC pipe, into which the waste water will be drawn.


I had originally intended to drill the (uptake tube) holes differently. There were to be two located one either side of centre and one at each extremity. You can see this in the pictures of the plans, above. I figured that there would be greater water velocity nearer the filter, than what would be seen at the two ends. Hoping to reduce the pressure difference to near zero between each barrack, the holes have been relocated to two pairs either side of the first and third barriers. I also hope that the larger diameter pipework will help to balance the system out.


That's all. Had a busy w.end, so only got a little done today, and this is where it's at....


I think I've got the bug now, though, so expect to see much more over the coming week.


Bye! B)
 

ghengis

cunninglinguist
Jun 23, 2008
188
0
0
Cairns, Australia.
Oops, double!!


...but since I'm here, what's the story with plumbers glue and toxicity in water? I guess it must be potable, as they use it domestically... I need to figure a way of attaching the backing pieces smoothly.
 
Last edited:

Rbishop

Administrator
Staff member
Dec 30, 2005
40,727
452
143
70
Real Name
Mr. Normal
Nice project, but is the sealant you used just on the inside..none used to st the panes in..?

Seems too weak for me.
 

ghengis

cunninglinguist
Jun 23, 2008
188
0
0
Cairns, Australia.
Looking at the initial pic's, you could be forgiven for thinking that. It was a real mess, with little joint strength. When I went back and rebuilt it, I had a spare set of hands (GF), so I was able to apply Silicone to an edge or face and set it in place, ensuring there was sufficient contact area for the sealant. I followed up with a large bead around all the inside corners.

I think it's strong enough. I've done a leak test, and let it sit (with water) for a couple days, with no hassles. Fingers crossed for the long term!
 

luckydud13

Did you hear that?
Jun 20, 2008
1,269
0
36
Charlotte, NC
Great Work! How many compartments are going to be in there??? Oh and great job btw
 

luckydud13

Did you hear that?
Jun 20, 2008
1,269
0
36
Charlotte, NC
Cool! As soon as I clear out my closet I am going to make something similiar. Can't wait to se how this goes! Ok so leme see if I got this right. The water flows through the vets, down the back of the wall, and water also flows through the little hole things at the bottom, then the water in that compartment is then sucked up the powerhead into what? And what size jars were you using to hold them bettas?
 

ghengis

cunninglinguist
Jun 23, 2008
188
0
0
Cairns, Australia.
You're sort of almost right... Think of a Reefer set up, with the water overflowing to behind the main tank area, then back in via the pipe work. Now reverse that system in your mind....

Basically, those black fittings at the bottom? Those will have extensions added to them, just another length of tube with holes drilled along the sides, that will act much like HOB filter siphons, only horizontal. They'll be joined in the rear section to the PVC "T". Water will then uptake from the cubicles, via these "siphons", toward the powerhead. See that little downturned "snout" on the powerhead? That'll hook up to a (custom) spray bar mounted low in that area, firing straight into the tank floor. The churning water will overflow back into each compartment via the vents/grilles at the top. I will probably need to remove some of the vanes from the impeller or add an irrigation flow control (or both) to ensure there is not too much current in the cubicles.

It does look as though there won't be much room for filter media in the upright PVC piece, but I am relying on the fact that I'll have all of four fish in 80-90L of water, so the bio-load will be very low. All I should need, is just enough media to culture sufficient bacteria to handle this light load. In all honesty, the "filter" is more about water circulation, in this instance, with actual "filtration" playing second fiddle.

I hope that explains it..??
 

owl

\m/ \m/
Jul 8, 2008
704
0
0
well well well :) hi all
it seems great so far :) wish i had time and place to build something like that for my betta ( and buy more bettas :D :D )
This is a 3mm sheet of flooring underlay. Any ideas how this stuff will hold up under water?
mm i don think they hold up that long in the water , as u know it design to stay on dry place ,( just test it on a small piece , put it in the water for days and see how s it :) ) and one thing else , u sure those aren t toxic or make the water toxic if they stay long in water ?
the T bar pvc will have holes on it yeah, am i right ? ?
what if u try another T shape bar ( with smaller diameter ) for the pump out-take ? to level the output of the pump output ( and the in-take of separate rooms ) same ?
we wait for more :)
good luck
 
zoomed.com
hikariusa.com
aqaimports.com
Store